Follow Me On Social Media!
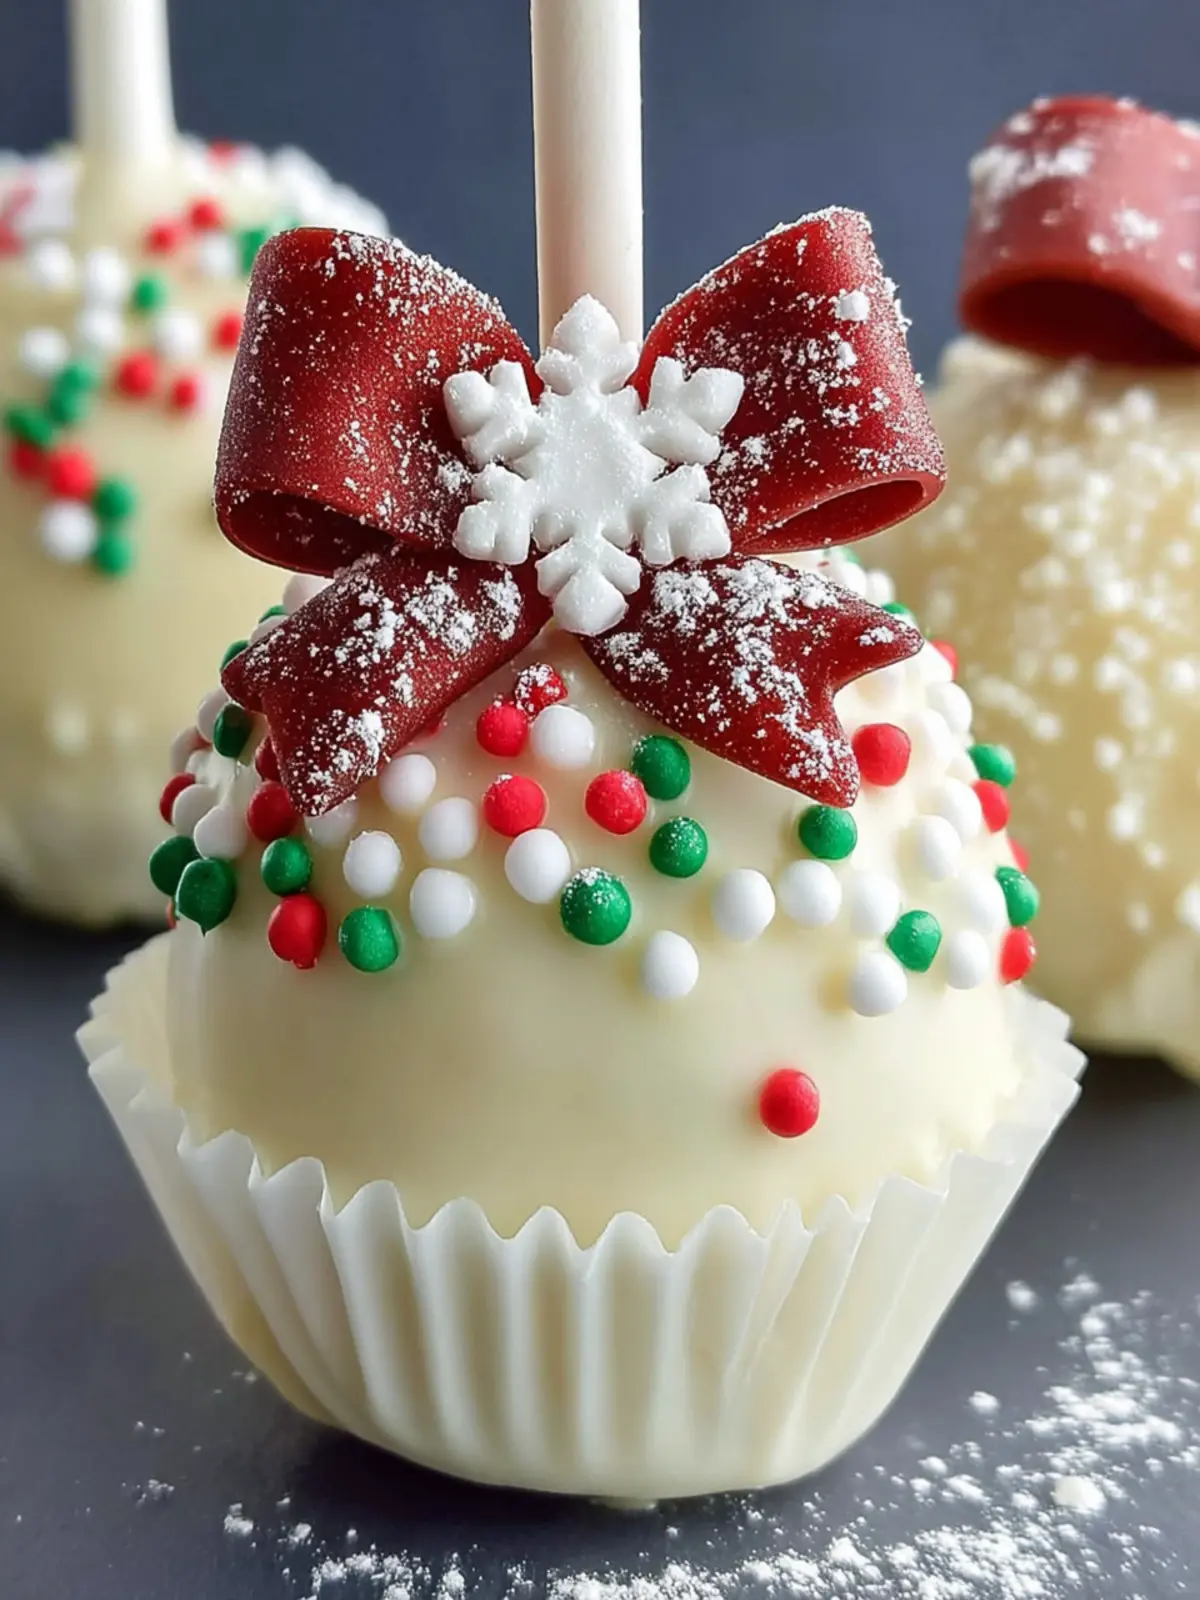
Festive Holiday Cake Pops Recipe That’ll Make You Smile
Introduction to Festive Holiday Cake Pops Recipe
Imagine a cozy gathering, filled with laughter and the delightful aroma of holiday treats wafting through the air. This scene comes alive with our Festive Holiday Cake Pops Recipe, a joyous combination of flavors and colors that radiate the spirit of the season. Not only are these bite-sized delights visually stunning, but they also pack a punch of flavor, making them the perfect centerpiece for any holiday celebration.
Why cake pops are the perfect holiday treat
Cake pops are amongst the most charming confections you can make during the festive period. But what makes them so special? Here’s why they stand out:
-
Versatility: With cake pops, the flavor possibilities are endless. You can blend different cake flavors with various coatings and toppings, allowing you to create unique and personalized treats that cater to everyone’s taste buds.
-
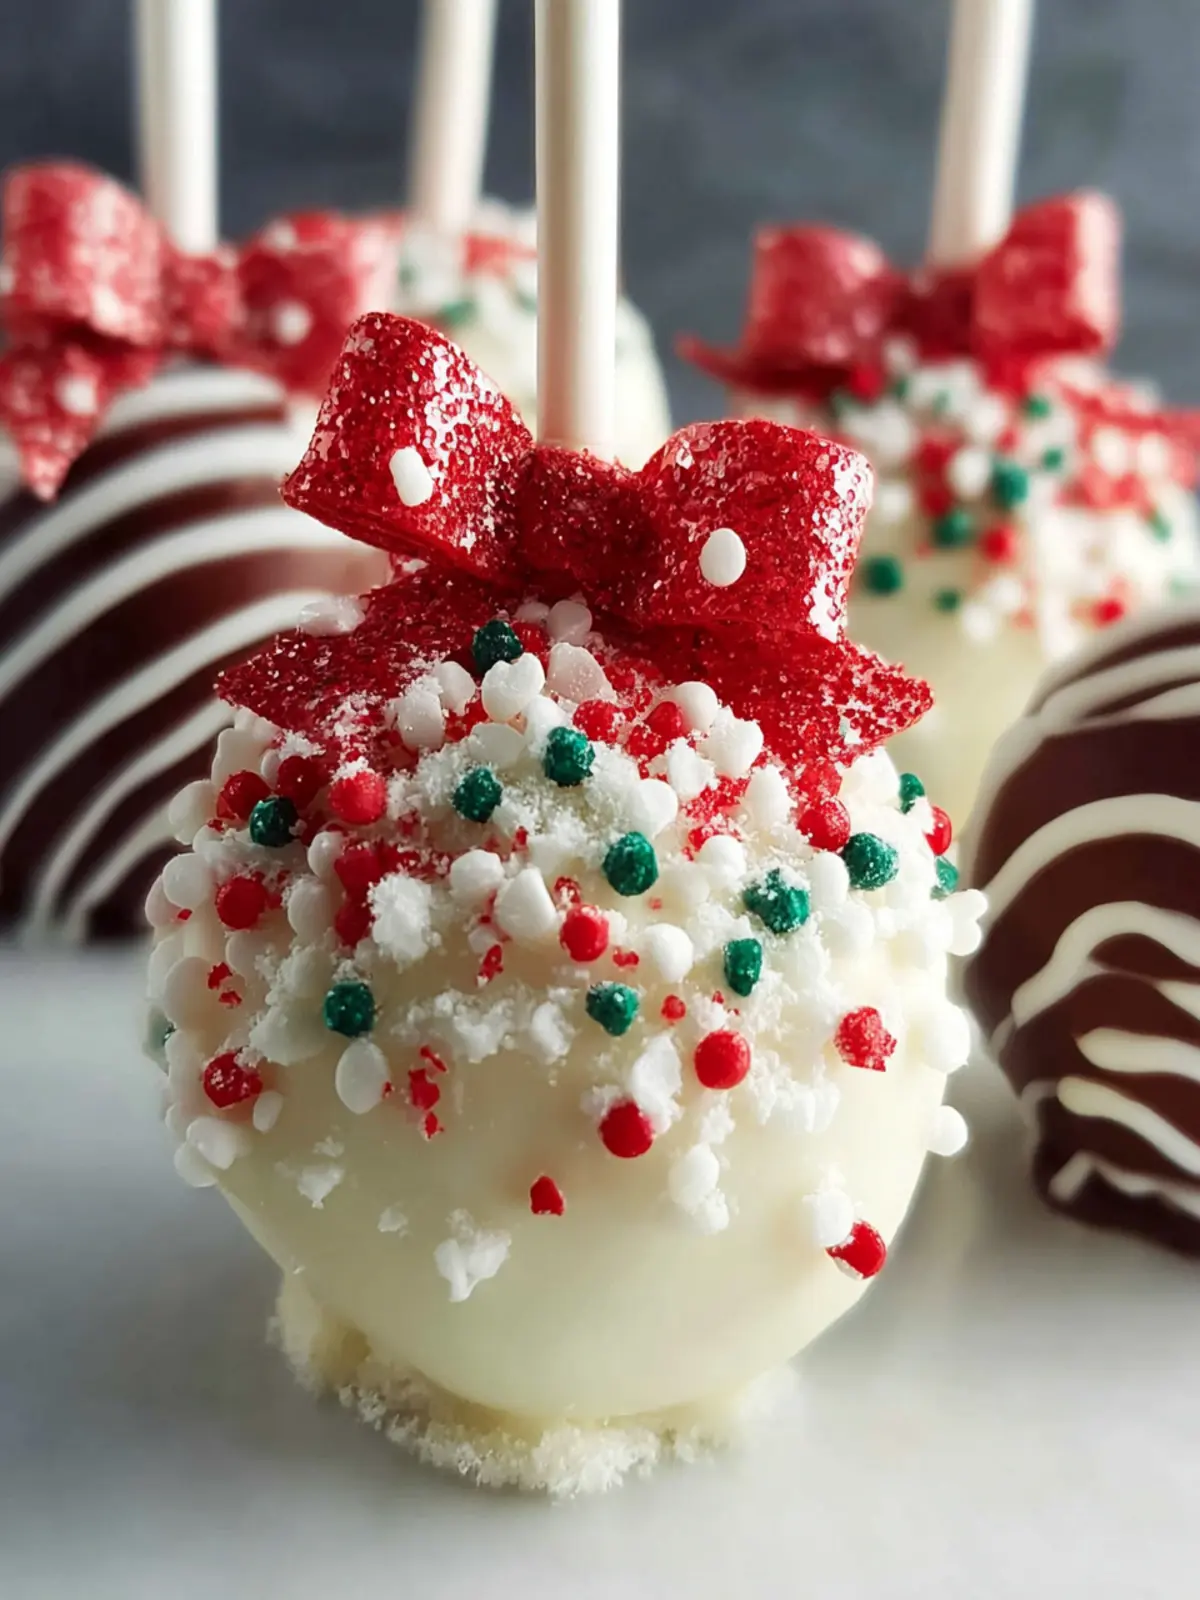
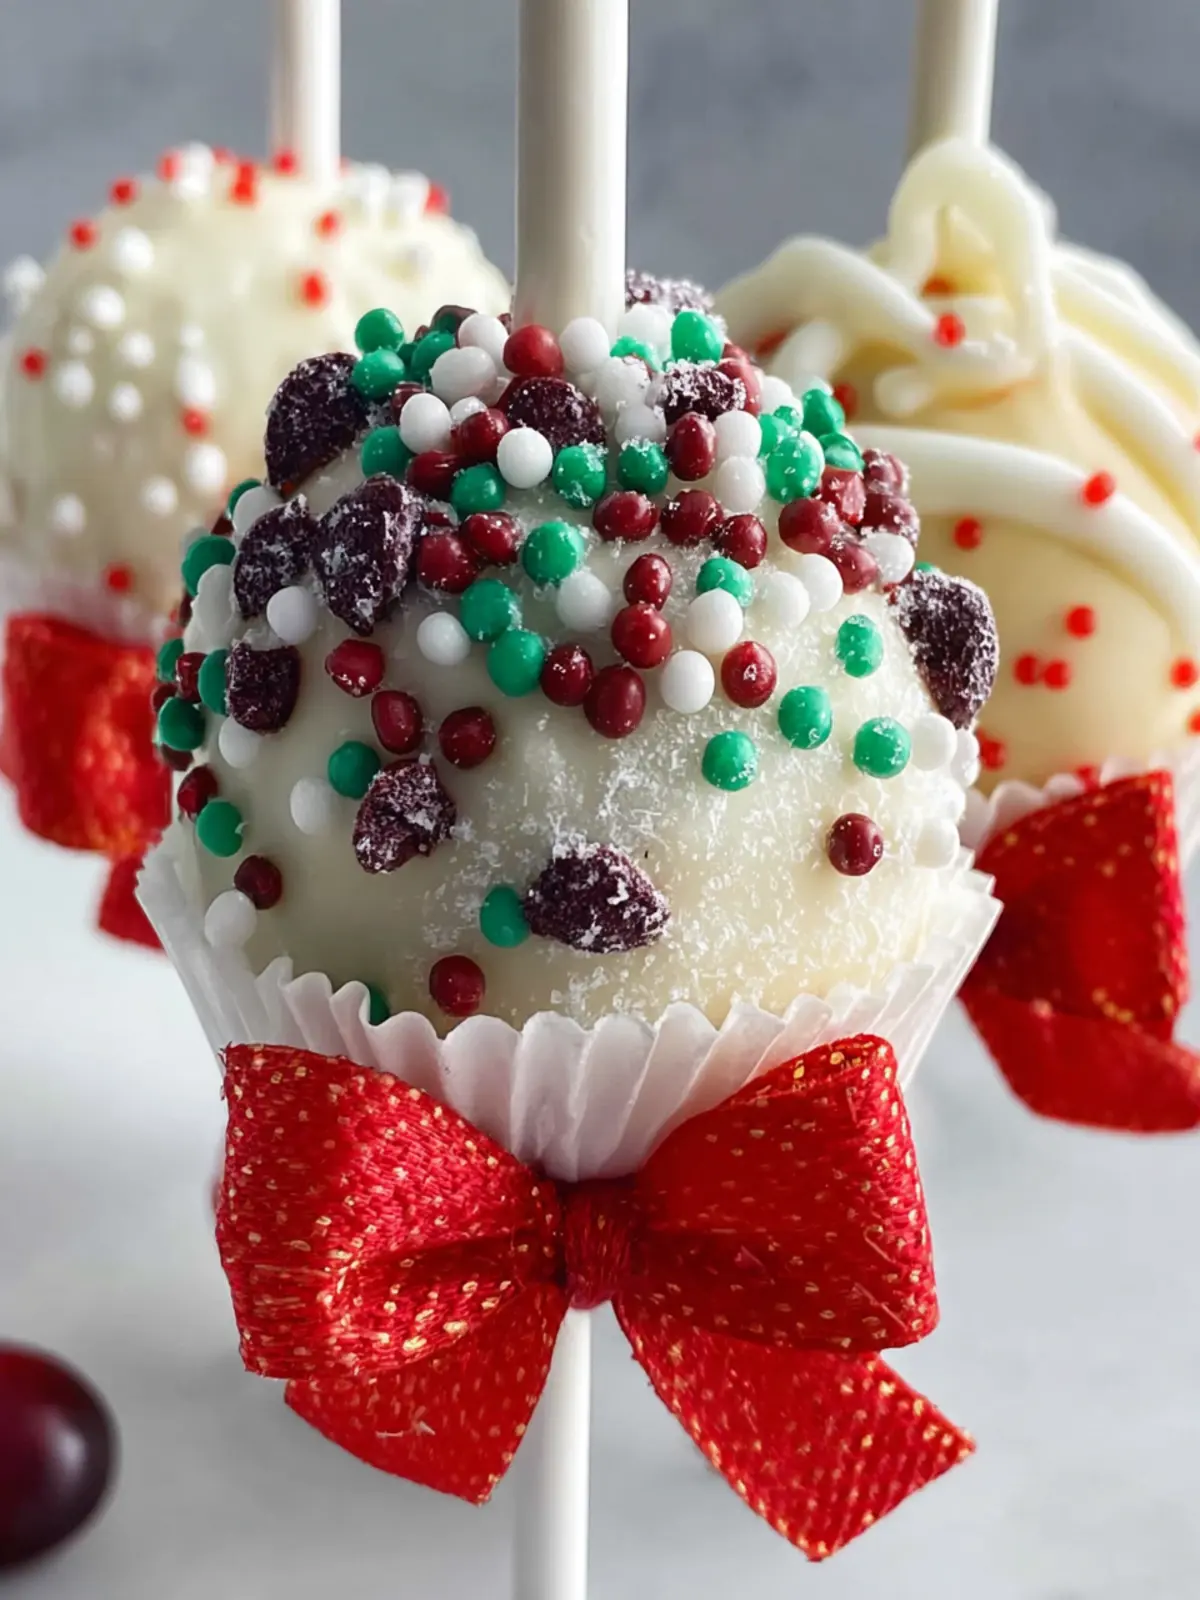
Presentation: Their small size and vibrant colors make cake pops a feast for the eyes. You can easily decorate them with festive sprinkles, chocolate drizzles, or themed designs, transforming them into edible works of art that can elevate your holiday dessert table.
-
Portability: These delightful morsels are perfect for parties. Guests can easily pop one in their mouth for a quick sweet fix, making them an ideal treat for mingling at gatherings. Plus, they require no plates or utensils, making clean-up a breeze!
-
Fun for All Ages: Making cake pops is not just about eating; it’s a joyful activity that everyone can participate in. Gather friends or family members around your kitchen, enjoy some laughs, and create these treats together. It’s an excellent way to bond and make memories!
-
Gifting: Wrapped beautifully and decorated festively, cake pops can serve as charming gifts for friends, family, or colleagues. Imagine the smiles they’ll bring when someone unwraps a beautifully crafted cake pop gift.
By embracing the magic of cake pops, you’ll add a delightful touch to your holiday festivities, making your gatherings even more special. So, let’s dive into the world of cake pops and create some unforgettable moments this holiday season!
Key Ingredients for Festive Holiday Cake Pops
Creating your own festive holiday cake pops is a delightful way to bring sweetness to your seasonal celebrations. To ensure your cake pops turn out perfectly, here are the essential ingredients you’ll need:
Cake mix
For the best flavor, choose a box of cake mix that excites you. Varieties like vanilla, chocolate, or even fun seasonal flavors can serve as the base for your cake pops, allowing you to match the flavor with your holiday spirit. Whether it’s gingerbread or rich chocolate, the right cake mix can set the tone for your treats.
Frosting
I recommend using vanilla or cream cheese frosting. These options add moisture and sweetness, ensuring that every bite of your cake pop is both decadent and satisfying. The frosting binds the cake crumbs together and enhances the overall flavor profile.
Candy melts
For coating, colorful candy melts are a fantastic choice. They allow you to achieve a smooth, glossy finish with ease. Opt for white or your favorite festive color to align with your holiday theme, creating eye-catching treats.
Sprinkles
A must-have for decoration! Use red, green, and white sprinkles to really bring out that cheerful holiday spirit. They not only add a pop of color but also provide a delightful crunch with each bite.
Lollipop sticks
These sturdy sticks are essential for both assembly and presentation. They make your cake pops easy to hold and enjoy, adding to your festive gathering’s overall aesthetic. Plus, they’re a fun way to serve your delicious creations!
Why You’ll Love This Festive Holiday Cake Pops Recipe
If you’ve ever felt the joy of a homemade treat bringing friends and family together during the holidays, then this festive holiday cake pops recipe will delight your taste buds and warm your heart. Picture it: a cozy kitchen filled with the scents of baking, laughter as you decorate, and those vibrant little cake pops ready to be devoured.
Great for any gathering, these cake pops are perfect for both casual get-togethers and more formal celebrations. They are:
- Visually Appealing: Their bright colors and cute shapes add a playful twist to your dessert table, making them a hit with both kids and adults.
- Customizable: You can easily switch up the flavors and decorations, making them as unique as your style. Whether you prefer chocolate, vanilla, or something more adventurous, the options are endless!
- Easy to Share: Each pop is a perfectly portioned treat, meaning no cutting, serving, or mess afterwards—just indulge.
- Fun to Make: The process of mixing, rolling, and decorating can be a wonderful activity to do with friends or family, creating lasting memories during the busy holiday season.
It’s time to roll up your sleeves and get into the holiday spirit with this delightful treat! You’ll be amazed at how much joy these little bites of sweetness can bring.

Tips for Making Perfect Cake Pops
Creating festive holiday cake pops is an art, and with a little guidance, you’ll be crafting these delightful treats like a pro. Here are some friendly tips to ensure your cake pops are not only stunning but also delicious.
Choose the Right Cake and Frosting
Selecting your cake type is crucial! A moist cake is essential for smooth rolling. Whether you prefer chocolate, vanilla, or something more adventurous, intuition is your best ally. Pair it with a frosting that complements the flavor—cream cheese or buttercream works wonders.
Crumble and Mix
When crumbling your cake, ensure it’s completely cool. Warm cake can lead to a gooey mess. Aim for fine crumbs to achieve a consistent mix with your frosting. Too much frosting can drown out the cake flavor, so start by adding half, and adjust if needed.
The Perfect Coating
Melted chocolate or candy melts are your best friends for coating. Temperatures play a vital role here; ensure your melts aren’t too hot to avoid a runny finish. Dip each cake pop stick into the coating before inserting it into the cake ball; this keeps them secure.
Chill and Set
After shaping and coating, let your cake pops chill in the fridge for at least 30 minutes. This helps them hold their shape and the coating will set perfectly.
These simple strategies will elevate your festive holiday cake pops recipe into an impressive seasonal treat that will have everyone asking for seconds!
Time Details for Cake Pops
Creating these delightful festive holiday cake pops is not only fun but a great way to spread cheer during the holiday season. With a little planning, you can whip them up in no time.
Preparation time
Get your kitchen ready! The preparation for these cake pops will take about 30 minutes. This includes mixing ingredients and allowing the cake to cool before shaping.
Cooking time
While there’s no traditional cooking involved, you will need time for the cake to bake in the oven. This typically takes about 25-30 minutes, depending on your oven settings.
Total time
In total, you’ll invest roughly one hour in creating your festive holiday cake pops. After that, it’s all about decorating and enjoying these sweet treats with friends and family!
Nutritional Information for Cake Pops
Creating a delightful batch of festive holiday cake pops is just the beginning; understanding the nutritional aspects makes them even more enjoyable. With each pop, you can indulge in deliciousness while keeping an eye on what you’re consuming.
Calories
Each cake pop typically contains about 140 calories. This makes them a charming treat for holiday gatherings without completely derailing your dietary plans.
Protein
You’ll find approximately 2 grams of protein in each pop, offering a small boost that complements the sweetness while helping to keep you satisfied.
Sugar Content
On the sweeter side, each cake pop has around 10 grams of sugar. If you have a sweet tooth, you’ll love this sugary indulgence to complement your holiday spirit!
Understanding these nutritional details will help you savor every bite of your festive holiday cake pops recipe while staying mindful of your overall wellness.
FAQs about Cake Pops
Creating festive holiday cake pops can spark creativity and joy, but it’s normal to have some questions along the way. Let’s address a few common queries to ensure your baking experience is smooth and enjoyable!
How do I keep cake pops from falling apart?
Keeping those delightful cake pops intact is crucial for presentation and enjoyment. Here are some tips:
- Proper Crumbling: Make sure to crumble your cake finely before mixing with the frosting. Large chunks can lead to instability.
- Chill Before Dipping: Always chill your cake pop mixture before shaping and dipping. This solidifies the mixture, making it easier to handle.
- Quality Coating: Use good melting chocolate or candy coating. The chocolate should be warm yet not too hot, as this can cause the cake pop to slide off the stick.
Can I use other flavors for my cake pops?
Absolutely! While our festive holiday cake pops recipe showcases classic flavors, the beauty of cake pops lies in their versatility. Consider:
- Fruits: Lemon, orange, or even banana can add a vibrant twist.
- Chocolate Variants: Use different flavored cakes, like red velvet or chocolate, to offer a variety of options.
- Add-Ins: Incorporate crushed candies, nuts, or spices like cinnamon to customize your flavor profile.
What’s the best way to store cake pops?
Proper storage can extend the shelf life of your cake pops and maintain their freshness. Here’s how to do it right:
- Room Temperature: If you plan to eat them within a few days, cake pops can be stored at room temperature in an airtight container.
- Refrigeration: For longer storage, keep them in the fridge for up to a week. Just ensure they’re well-wrapped to prevent any moisture entering.
- Freezing: You can also freeze cake pops for several months. Just remember to let them thaw in the fridge before serving to keep the coating nice and firm.
With these tips, your festive holiday cake pops will not only taste incredible but also look stunning! Enjoy the process and happy baking!
Conclusion on Festive Holiday Cake Pops Recipe
Creating these festive holiday cake pops is truly a delightful experience that brings joy and creativity to the baking process. Not only do they add a whimsical touch to your holiday gatherings, but they also cater to your taste buds with their rich flavors and textures. Remember, the beauty of this recipe lies in its versatility; you can mix and match toppings and decorations to suit your style. So gather your loved ones, roll up your sleeves, and get ready to create some sweet magic in the kitchen! These cake pops are sure to become a cherished tradition in your holiday festivities.
Print
Festive Holiday Cake Pops
- Total Time: 2 hours
- Yield: Approximately 24 cake pops 1x
Description
Enjoy your festive holiday cake pops!
Ingredients
Scale
- 1 box cake mix (any flavor)
- Ingredients specified on the cake box (usually eggs, oil, and water)
- 1 cup frosting (vanilla or cream cheese)
- 1 package candy melts (white or preferred color)
- Sprinkles in festive colors (red, green, white)
- Lollipop sticks
- Styrofoam block or cake pop stand for drying
Instructions
- Prepare the Cake:
- Bake the cake according to the instructions on the box.
- Allow the cake to cool completely.
- Make Cake Pop Mixture:
- Crumble the cooled cake into a large bowl.
- Add frosting to the crumbled cake and mix until well combined and moist.
- Shape the Cake Pops:
- Roll cake mixture into small balls, about 1 inch in diameter.
- Place the balls on a baking sheet lined with parchment paper.
- Refrigerate for at least 2 hours or freeze for 30 minutes to firm up.
- Prepare for Dipping:
- Melt the candy melts according to the package instructions.
- Dip the tip of each lollipop stick into the melted candy, then insert it halfway into each cake ball.
- Return to the refrigerator for 30 minutes.
- Coat the Cake Pops:
- Dip each cake pop into the melted candy melts, ensuring even coating.
- Gently tap off excess coating while swirling the pop to prevent drips.
- Immediately add sprinkles before the coating sets.
- Dry the Cake Pops:
- Insert the sticks into a styrofoam block or stand until the coating is firm.
Notes
- Ensure the cake pops are well chilled before dipping to prevent them from falling apart.
- Use shortening or oil to thin out candy melts if too thick.
- Experiment with different cake and frosting flavors for variety.
- Store in an airtight container at room temperature for up to a week, or refrigerate for longer storage.
- Prep Time: 1.5 hours
- Cook Time: 30 minutes
- Category: Dessert
- Method: Baking
- Cuisine: American
Nutrition
- Serving Size: 1 cake pop